

So you want to bake artisan sourdough at home? You're in the right place. This sourdough bread recipe is built for bakers of every level, whether you're pulling your first loaf out of the oven or you've been baking for years.
You only need four things: flour, water, salt and an active sourdough starter. No commercial yeast, no bread machine, no stand mixer, and no kneading. Just a bit of elbow grease and a lot of patience. The payoff is a proper artisan loaf with a crunchy golden crust and an open, chewy crumb.
You'll go from activating your starter through stretching and folding the dough to shaping, proofing and baking, with videos along the way for the steps that are easier to watch than to read. Everything is explained in plain baking terms, no jargon. If you haven't got a starter going yet, we sell our own dried sourdough starter online to get you started.
One honest word before you start: failure is part of this. The trick is to keep baking through the flops. Trust me, I've had plenty. Stick with it and sourdough becomes second nature. And remember, no two loaves are ever the same, so enjoy the unpredictable bit too.
In this recipe
- Recipe at a glance
- Sample timeline
- What you'll need (ingredients and tools)
- The method, step by step
- More sourdough recipes
- Frequently asked questions
Recipe at a glance
- Prep: around 25 minutes of hands-on time
- Bulk fermentation: 3 to 8 hours
- Proofing: 1 to 4 hours at room temperature, or overnight in the fridge
- Baking: 45 to 50 minutes
- Makes: 1 loaf, around 900g
- Skill level: beginner friendly, with no kneading or fancy equipment
Sample timeline
Most of sourdough is waiting, not working. Here are two ways the day can run. Treat the times as a guide, your kitchen temperature changes everything.
The overnight method (most popular)
- Morning: feed your starter and wait for it to peak
- Early afternoon: mix the dough, then leave it to autolyse
- Afternoon: stretch and folds, then bulk ferment
- Early evening: shape the dough and put it in the fridge overnight
- Next morning: bake straight from the fridge
The same-day method
- Early morning: feed your starter, or use one that's already active
- Late morning: mix, autolyse, then start your stretch and folds
- Through the afternoon: bulk ferment
- Late afternoon: shape, then proof at room temperature
- Evening: bake
What you'll need
New to sourdough? Start with our Complete Sourdough Starter Kit, get the basics down with Sourdough 101, and keep our Sourdough FAQs and baking tools handy as you go.
Ingredients
- 150g (⅔ cup) active sourdough starter
- 350g (1 ⅓ cup) room temperature water (filtered)
- 500g (3 ⅔ cup) bread flour
- 10g fine salt
Tools
- Mixing bowl
- Dough whisk
- Plastic wrap, or bowl cover
- Dough scraper
- Banneton proofing basket
- Bread lame
- Dutch oven
A note on hydration
For the number crunchers: this dough sits at roughly 70% hydration based on the water and flour you add directly, or about 74% once you count what's already in your starter (a standard starter is half flour, half water). In practice that means a wet-ish dough that gives an open, airy crumb without being too hard to handle.
If you want to adjust it:
- For a more open crumb, add 10 to 20g more water. Wetter dough is trickier to shape, so go slowly.
- If you're new to this, or your kitchen is humid, hold back 10 to 20g of water for a firmer, friendlier dough.
- Keep the salt at 10g (about 2%). It's not just for taste, it keeps the fermentation in check.
How to bake sourdough: step-by-step instructions
- Mix the starter and water. Add 150g (2/3 cup) of active, bubbly starter to 350g (1 + 1/3 cup) of room temperature water in a bowl. Stir until the starter is fully blended through.
- Add the flour and salt. Tip in 500g (3 + 2/3 cup) of bread flour and 10g (1 1/2 tsp) of fine, non-iodised salt. Mix with your dough whisk until there's no dry flour left in the bowl.
- Autolyse (a 30-minute rest). Right now the dough is a sticky, shaggy mess, and that's exactly how it should look. Cover the bowl with plastic wrap and leave it for 30 minutes so the flour can fully soak up the water. This rest is called the autolyse.
-
Stretch and fold. This is where we build strength, and it replaces kneading. (Yes, I know: why call it You Knead Sourdough if you barely knead? Fair.)
Sourdough is a wet dough that's a pain to knead by hand, so instead you stretch and fold. Wet your hands so it doesn't stick, grab one side, stretch it up, and fold it back over itself. Work around clockwise, four folds in all, one per side.
Do a full round every 30 minutes, five rounds over about two hours (the first is right after the autolyse). Keep your touch gentle so you don't knock the air out. Each round the dough gets smoother and stronger. Watch our video below for a clear example.
- Bulk fermentation. Now let it rise. Counting those two hours of folds, bulk fermentation takes 3 to 8 hours depending on your kitchen, with around 25 to 28°C the sweet spot. It's done when the dough has grown by about 30%.
-
Pre-shape, rest and shape. Tip the dough onto a clean, unfloured bench. The slight stickiness is what you want here, it helps the dough grip the surface and build early tension.
First, pre-shape. With your bench scraper and damp or lightly wet hands, gently gather the edges into the middle and drag the dough into a loose round, just enough to build a little surface tension. Don't overwork it, and try to keep the air in. Leave it to rest on the bare bench for 10 to 15 minutes so the gluten relaxes. This is the bench rest, and it makes the final shape much easier.
Now the final shape, and this is the only stage where flour comes in. Lightly dust the top of the dough with rice flour (it resists sticking better than normal flour), then use your bench scraper to flip it so the floured side is down and the sticky side faces up, ready to grip itself as you shape. Now fold the dough like a letter into an envelope: stretch it into a rough square, fold the top down by a third, fold both sides into the centre, then roll it up from the bottom. Check out our video below to see it done.
Place the dough smooth ('pretty') side down into an oval banneton dusted with rice flour. You can leave the cloth liner in or take it out, just dust whichever surface the dough will touch. Sprinkle a little flour on top, cover loosely, and put it in the fridge.
- Proof (the second rise). Let the shaped dough rise again: 1 to 4 hours at room temperature, or overnight in the fridge for a deeper, tangier flavour. It's ready when it passes the poke test. Press a finger in; the dough should spring back slowly and leave a small dent.
-
Score and get ready to bake. Put your Dutch oven in the oven and preheat to 250°C. No Dutch oven? Use a normal baking tray and slide a second tray on the rack below, then pour boiling water into it as the loaf goes in. That steam gives you a better oven spring.
Turn the dough out onto baking paper (or a silicone baking mat) and score the top with your bread lame (the razor tool). One long slash down the middle works well, or get creative. - Bake. Lower the oven to 220°C. Lift the loaf, paper and all, into the Dutch oven, lid on, and bake for 20 minutes. Take the lid off and bake another 25 to 30 minutes. It's done when it's deep golden brown and at least 97°C inside, or sounds hollow when you tap the base.
- Cool (the hardest part). Move the loaf to a wire rack and leave it to cool for at least an hour. I know it's tempting, but don't slice in early. Cut too soon and the steam escapes, leaving you with a gummy crumb.
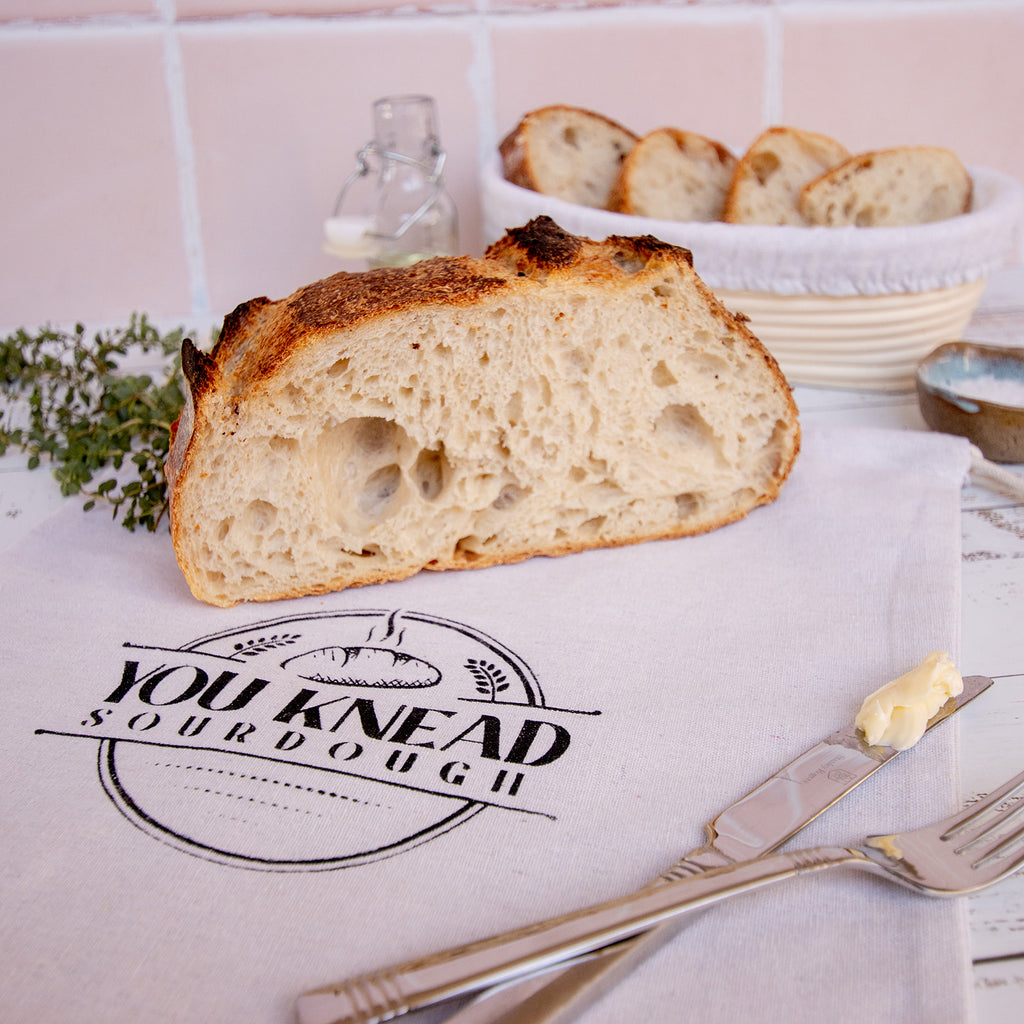
- Enjoy and share. Slice it up and have it with good butter and a little flaky salt. Tag us @youkneadsourdough or use #YouKneadSourdough so we can see how your loaf turned out.
Additional Sourdough Recipes
Now you've completed our step-by-step Sourdough Recipe, you might want to step up your baking game with one of our other delicious sourdough recipes, including:
- Healthy Whole Wheat Sourdough Recipe
- Ultimate Sourdough Pizza Recipe
- 7 Sourdough Discard Recipes
- Sourdough Starter Recipe
Still can't find a sourdough recipe that tickles your fancy? Whether you're a self-proclaimed sweet tooth, or a savoury person, we have sourdough recipes to suit every flavour.
Sourdough Frequently Asked Questions
Your questions, our answers. We have compiled some of the most frequently asked sourdough questions for beginners in one place, so you don't have to scour the internet looking for answers you seek next time you decide to bake your own sourdough loaf at home. If you don't find the information you're after, be sure to check out our extensive FAQs section.
What is sourdough bread?
Sourdough bread is slow-fermented bread which requires no commercial yeast to rise. Unlike normal bread, it uses a sourdough starter (a mixture of fermented flour and water that contains wild yeast and good bacteria) to rise. Sourdough is made using three main ingredients: flour, water and salt, as well as the sourdough starter.
How long does sourdough bread take to make?
Unfortunately, there is no definitive answer as to how long sourdough bread takes to make, as there are a lot of variables at play. Typically, preparation time for this sourdough recipe takes up to 25 minutes, which involves the combining and mixing of the active sourdough starter, water, bread flour and salt.
However, baking sourdough requires a lot of patience, as autolysing the dough takes 30 minutes, bulk fermentation takes anywhere between 3 to 8 hours, secondary fermentation takes 1 to 4 hours and baking should take up to 50 minutes. Meanwhile, freshly-baked sourdough requires an hour or so for cooling when it's taken out of the oven.
With all of these different variables in mind, sourdough bread can take anywhere between 13 hours to 24 hours from start to finish.
When is my sourdough starter ready to use?
Your starter is ready to use, or 'active', when it becomes bubbly and doubles in size.
However, this can take anywhere from 2 to 12 hours or more depending on temperature and the condition of your starter, so patience is a virtue when it comes to baking sourdough!
You can test whether your sourdough starter is ready to use by doing the float test, which is where you drop 1 teaspoon of your starter into a glass of water. If the starter floats to the top it's ready to use. But, if it sinks your starter should be fed again.
What if I burn or ruin my sourdough bread?
Mistakes happen. Like I always say, it's important to keep baking through the failures if you want to master the art of sourdough. Besides, just because your sourdough is a little burnt, or out of shape doesn't mean it's not edible. You can still eat your mistakes!
If you do burn your sourdough loaf, or make a bit of a mess, you can turn your loaf into breadcrumbs for meatballs or croutons for a salad!
What is autolyse?
Autolyse is the first resting period right after you mix the dough. It jumpstarts gluten development without kneading. The stronger the gluten, the better the bread!
If you're wondering how long the autolyse process takes, it can range anywhere from 15 minutes to one hour or more, depending on the type of bread you're making and the recipe. For this recipe, I always aim for 30 minutes for the gluten to develop properly. The dough will become more soft and manageable to work with afterwards.
Why is my sourdough flat or dense?
This usually comes down to one of two things: a starter that wasn't quite active enough, or dough that was under or over-proofed. Make sure your starter is bubbly and passes the float test before you mix. After that, watch the dough rather than the clock. It should rise by about 30% during bulk fermentation and spring back slowly when you poke it. Skipping the stretch and folds can leave you with a tight crumb too, so try not to rush them.
Can I use plain flour instead of bread flour?
You can, but bread flour will give you a better loaf. It has more protein, which builds stronger gluten and traps more gas for a better rise and a chewier crumb. Plain flour still works in a pinch, your loaf will just sit a bit flatter and softer. I use a premium Australian-grown bread flour for this recipe.
Why didn't my bread rise?
Nine times out of ten it's the starter. If it isn't active and bubbly when you mix, there isn't enough wild yeast to lift the dough. A cold kitchen slows everything down as well, so aim for somewhere around 25 to 28°C and give the dough the time it needs instead of rushing it to the oven.
