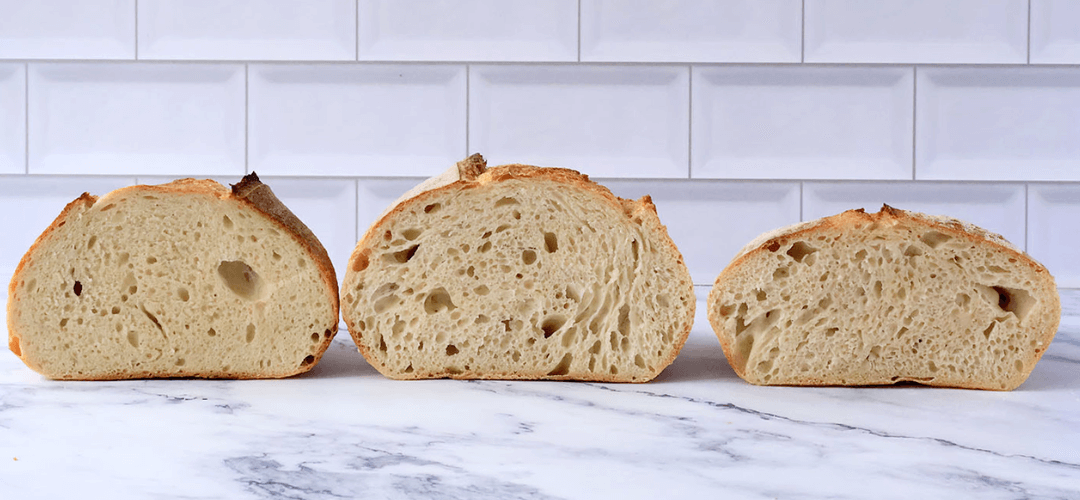
In the art of sourdough baking, mastering the proofing process is key to achieving that coveted airy crumb and delightful crust. Proofing, simply put, is the crucial stage where the dough undergoes fermentation and rises before it hits the oven. This period allows the yeast and bacteria within the dough to generate carbon dioxide, which gets trapped by the elastic gluten network, causing the dough to expand and rise.

Under-proofing: Rushing the Rise
Under-proofing occurs when the dough hasn’t had sufficient time to ferment and rise adequately. At this stage, the gluten network may not be fully developed, resulting in a dense and compact loaf. Signs of under-proofing include a tight crumb structure with small, closely packed holes or even large air pockets surrounded by dense dough.
To avoid under-proofing, ensure your dough achieves a 30-50% increase in volume from its original size. Marking your mixing bowl or container can help visually track this rise, ensuring you hit the sweet spot for optimal fermentation.

Over-proofing: When Patience Turns Flat
Conversely, over-proofing happens when the dough is left to ferment for too long. This extended period causes excessive gas production, which weakens the gluten structure. As a result, the dough collapses rather than rises during baking, yielding a flat, overly sour loaf. Characteristics of an over-proofed loaf include a flat shape that struggles to rise in the oven, with scoring marks that fail to open up as expected and irregular, large holes in the crumb.
To prevent over-proofing, monitor the dough closely during fermentation. Factors such as ambient temperature and the activity of your sourdough starter can affect proofing times. Aim to catch the dough at its peak rise, just before it collapses or flattens out.

Finding the Sweet Spot: Perfect Proofing
Achieving the perfect proofing stage involves finding the ideal balance between under-proofing and over-proofing. Here’s how you can ensure your dough is perfectly proofed:
1. Visual and Tactile Cues: Use visual markers on your bowl to track the rise of the dough. Additionally, gently poke the dough with your finger—properly proofed dough will slowly spring back, leaving a slight indentation.
2. Room Temperature Awareness: Maintain a consistent, moderate room temperature for proofing. Cooler temperatures will slow down fermentation, while warmer temperatures can accelerate it.
3. Adjusting Time According to Sourdough Activity: The activity of your sourdough starter can vary based on feeding schedules and ambient conditions. Adjust proofing times accordingly to account for starter activity.
4. Experiment and Learn: Each batch of sourdough may behave differently. Keep notes on proofing times, ambient temperatures, and outcomes to refine your process over time.

The Perfectly Proofed Result
When proofed just right, your sourdough will exhibit a beautifully risen shape, with a golden, evenly baked crust. The interior crumb will be open and airy, with a desirable distribution of holes throughout. Achieving this balance of texture and flavour rewards the patience and skill inherent in sourdough baking.
In conclusion, while mastering proofing in sourdough baking requires attention to detail and practice, the results—a perfectly proofed loaf with a light, flavourful crumb—are well worth the effort. By understanding the signs of under-proofing and over-proofing and adjusting your techniques accordingly, you can consistently produce artisanal sourdough bread that delights both the eye and the palate. Happy baking!


